Silky water effect
Since I started this photography blog, I might as well share some of my techniques/tips with you. I am not a professional whatsoever, so I just kind of learned by doing. I will share the way I take a certain photograph, but there may be different ways to get the same result. I will try to explain the way I set my camera and what I do to get the effect, etc...
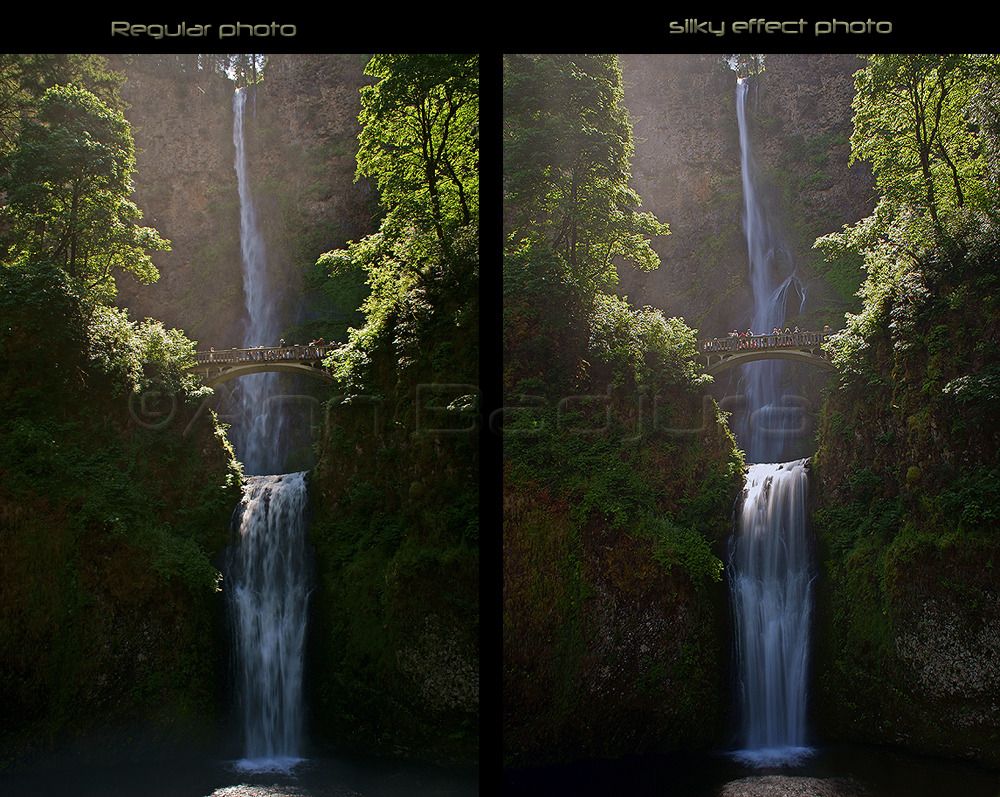
In this post I will explain how you can get that silky effect on water. You use a slow shutter speed to get that kind of effect and this really works well for waterfalls and rivers. You can use a similar technique for other bodies of water (ocean, lake, etc...). More on that in a different post.
In this post I will explain how you can get that silky effect on water. You use a slow shutter speed to get that kind of effect and this really works well for waterfalls and rivers. You can use a similar technique for other bodies of water (ocean, lake, etc...). More on that in a different post.
Camera settings for the 2 photos above:
Left photo:
*F-Number: F/10
*Exposure Time: 1/10 sec.
*ISO Speed: ISO-100
*Exposure Program: Aperture Priority (A)
*Exposure Compensation (E/V): -1 step
-->Polarizing filter was used and some post processing work done in Photoshop (little more contrast & saturation)
Right photo:
*F-Number: F/22
*Exposure Time: 1/2 sec.
*ISO Speed: ISO-100
*Exposure Program: Aperture Priority (A)
*Exposure Compensation (E/V): -2 step
-->Polarizing filter was used and some post processing work done in Photoshop (little more contrast & saturation)
How to take a photo like the one on the right: First of all it's very important that you have a tripod for such photos as you will be using a slower shutter speed. You will need a camera that allows you to change some settings, this won't work on a fully automatic camera. Most camera's that allow you to change some of the settings will have a little dial on top of the camera. Look for the "S" on the dial, this stands for "Shutter priority". Turn you camera on the "S" setting. Then you need to figure out how you can change the "S" number. Usually it's done by another little dial, move it until you see 1/10 or 1/8. You may already get some effect with 1/10, but you're better off to go for a lower number like 1/4 - 1/2 as this gives even a better result.
I also recommend that you change the "exposure value", usually referred to as E/V or the little button with the +/- on your camera. Set this exposure value to -2.0 and I also recommend using the "timer" on your camera to avoid camera shake when pressing the shutter button. Set the timer to 2 sec. or 10 sec. which ever one you prefer and you can start trying to take a photo. The slower the shutter speed, the better the effect on the water. You can use a polarizing filter or and ND (neutral density) filter to be able to get even a lower shutter speed. I hope this makes sense and that those who haven't tried it yet will have fun trying this out. Good luck and thank you for reading my blog!
If any of you have questions, comments or like to share their own ideas...please leave a comment below (just click on "no comments"!
Thank you for stopping by!
Ann
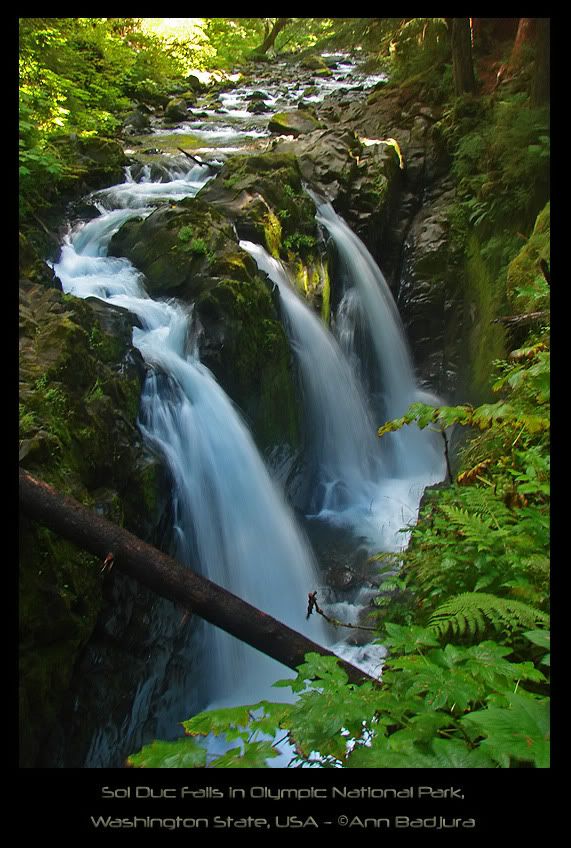
Here is another examples of the silky water effect on waterfalls:
I also recommend that you change the "exposure value", usually referred to as E/V or the little button with the +/- on your camera. Set this exposure value to -2.0 and I also recommend using the "timer" on your camera to avoid camera shake when pressing the shutter button. Set the timer to 2 sec. or 10 sec. which ever one you prefer and you can start trying to take a photo. The slower the shutter speed, the better the effect on the water. You can use a polarizing filter or and ND (neutral density) filter to be able to get even a lower shutter speed. I hope this makes sense and that those who haven't tried it yet will have fun trying this out. Good luck and thank you for reading my blog!
If any of you have questions, comments or like to share their own ideas...please leave a comment below (just click on "no comments"!
Thank you for stopping by!
Ann
Here is another examples of the silky water effect on waterfalls:
Images Copyright by Ann Badjura unless otherwise mentioned.
Contact me by email if you are interesting in buying or using any of my images. THANK YOU!
No comments:
Post a Comment